
How to Make FiveM Add-on Clothing: Files, YMT, Slots and Install
FiveM add-on clothing is a set of model and texture files for the two multiplayer freemode peds, plus a small description file (the YMT) and a shop metadata file that tell the game the pieces exist. Get those right and your clothes appear in any menu that lists add-on clothing, next to the normal GTA clothes, without replacing anything. This guide explains the files, the slots and the limits, how to install the result, and two ways to make it: by hand, or in your browser with the Clothing Studio (BETA).
- Files per piece: a
.yddmodel and a.ytdtexture file (props use a.ydrmodel), one set for the male ped and one for the female ped. - Files per pack: a
.ymt, a shop metadata file, and anfxmanifest.luaat the top of the resource. - Limits: 255 drawables per clothing type, per gender, per collection, and 26 colour variations (a to z) per drawable.
- Textures: no single texture over 16 MiB of data. Keep clothing at 2048 or 1024 pixels, compressed, with mipmaps.
- Install: unzip into
resources,ensurethe folder name, restart the server, then reconnect.
What add-on clothing is, and how it differs from replace
GTA organises clothing in numbered slots called components. A replace pack puts new files in the place of existing GTA clothes with the same numbers, so players who wear that GTA item now see yours, and two replace packs that use the same item overwrite each other. An add-on pack registers its own collection of clothes that comes after the normal GTA ones. Nothing is overwritten, so several add-on packs can run on the same server. For a server with more than one clothing pack, add-on is the safer choice.
Components: the slots your clothes go in
Add-on clothes are made for mp_m_freemode_01 (male) and mp_f_freemode_01 (female). Each clothing type has a component number and a short code used in the file names.
| Component | What it is | File code |
|---|---|---|
| 1 | Masks | berd |
| 2 | Hair | hair |
| 3 | Arms (torso) | uppr |
| 4 | Legs | lowr |
| 5 | Bags and parachutes | hand |
| 6 | Shoes | feet |
| 7 | Neck and scarves | teef |
| 8 | Undershirt | accs |
| 9 | Body armour | task |
| 10 | Badges and decals | decl |
| 11 | Tops | jbib |
Props are a separate group: hats (p_head), glasses (p_eyes), ear accessories (p_ears), watches and bracelets. They use a .ydr model and their own texture files.
The files, one by one
| File | What it does |
|---|---|
jbib_000_u.ydd | The model of a piece. The number is the drawable, the code is the slot (here a top). |
jbib_diff_000_a_uni.ytd | The colour texture of that drawable. The letter (a, b, c and so on) is the colour variation, up to 26. |
mp_m_freemode_01_mp_m_name.ymt | Describes the collection: how many drawables each slot has, how many textures each one has, and the props. |
shop metadata (.meta) | Registers the collection with the game so clothing menus and shops can find it. |
fxmanifest.lua | Lists the metadata with data_file 'SHOP_PED_APPAREL_META_FILE' and sits at the top of the resource folder. |
The stream folder holds one set per ped and collection, for example a folder named after the ped and the collection for clothes and another for props. The exact layout the Clothing Studio writes is in the README inside the ZIP. Streamed files do not need to be listed one by one in the manifest.
Two points cause most hand-made packs to fail. First, the YMT counts have to match the files: if the YMT says a drawable has four textures and only three exist, the piece misbehaves. Second, drawable numbers are per ped and per slot, starting at 000 with no gaps, so a pack merged from several sources has to be renumbered.
Limits to plan for
- 255 drawables per clothing type, per gender, per collection. Many servers advise staying under 128 per collection if their client or server build is old, so check yours.
- 26 variations per drawable (letters a to z).
- 16 MiB for the data of any single texture. A 4096 by 4096 compressed (DXT5) texture with mipmaps is about 21.3 MiB and does not load; 2048 pixels is about 5.3 MiB.
- If a type passes 255, split the pack into several resources, for example
mypack_1,mypack_2, each with its own collection, and ensure them all.
Make it in your browser with the Clothing Studio (BETA)
The FiveMRides Clothing Studio is a BETA tool that does the steps above on a whole pack. Checks, fixes and the 3D preview are free with an account. A build is 1 credit per built resource, charged after the ZIP is built and verified, and free with Studio Unlimited.
- Collect the files. Gather the .ydd models and .ytd textures for each piece, for the male and the female ped, and the .ymt if the pack already has one.
- Add the pack to the Clothing Studio. Log in, open the Clothing Studio (BETA) and add the ZIP, RAR or folder. The free check lists missing files, duplicates and heavy textures.
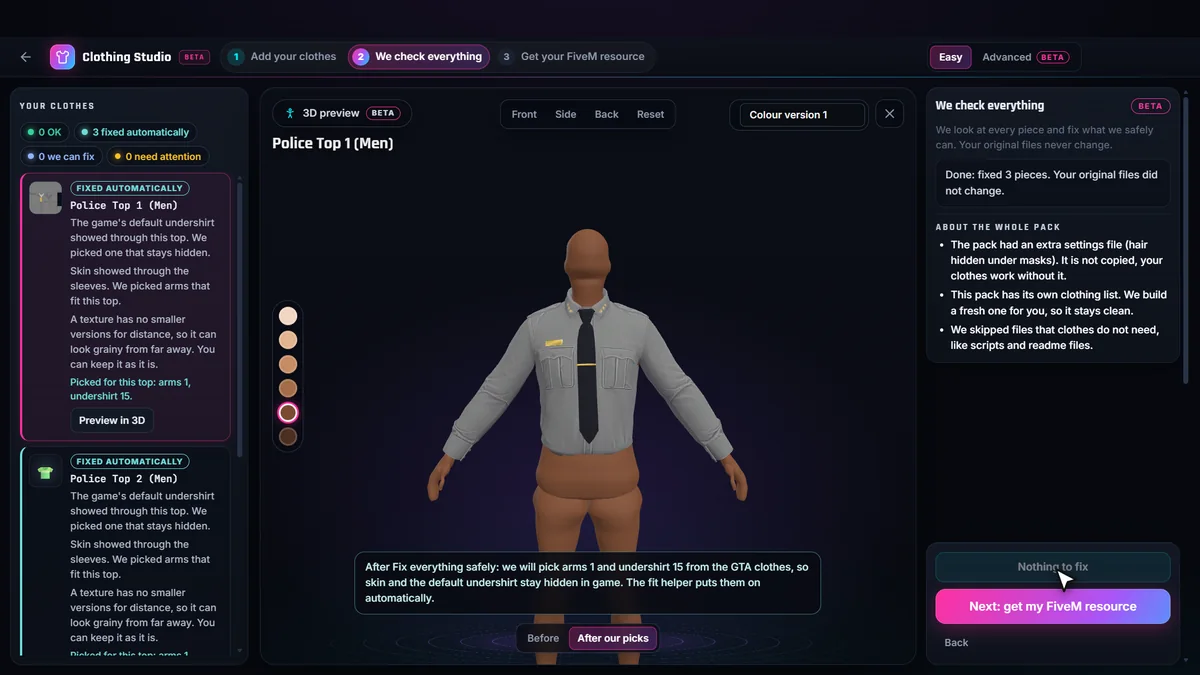
- Fix and name the pieces. Press Fix everything safely, look at the pieces on the 3D mannequin and rename them for your clothing menu.
- Choose Add as new clothes. This renumbers the pieces into a new collection and writes the YMT, the shop metadata and the manifest, so nothing in GTA is replaced.
- Pick the options. Tick the fit script to apply arms and undershirt with any menu, add the wardrobe menu if you want one, and split into several resources if a type passes 255.
- Build, download, install. Build for 1 credit, unzip the verified ZIP into resources, add the ensure lines from the README and restart the server.
- Test in game. Join with a fully restarted client, wear every piece on both genders and check the sleeves, the undershirt and the colours.
Easy or Advanced? Easy mode is the three-step wizard above and covers most packs: checks, safe fixes, arms and undershirt picks, names, and the add-on build. Advanced mode (BETA) is the full Studio in the browser for a pack you already checked in Easy mode: put logos and patches on garments in 3D, create new logo colour variations, crop unused texture space, reduce textures, fix clipping with 3D fit tools, set shop options such as heels and hats that flatten hair, and export the add-on pack. Each resource you download from Advanced mode is also 1 credit. Tattoos are not part of the Clothing Studio: use the Tattoo Studio.
The manual route
You can do all of this without a tool. You need a way to read and write the freemode YMT (a resource editor such as CodeWalker can export it as XML), a text editor for the shop metadata and the manifest, and patience for the renumbering. The risks are the ones listed under the files: counts that do not match, gaps in the numbering, and texture names that do not match their model. Build a small test pack with two pieces first, confirm it shows in game, then scale up. If your pack comes out of a tool or a download and clothes are missing, go to the guide on FiveM clothing not showing.
Install the resource
- Unzip the pack so that
fxmanifest.luais directly inside the resource folder. A folder inside a folder is the classic mistake: FiveM never finds the manifest. - Put the folder in
resources, or in a category folder written in square brackets. - Add
ensure foldernametoserver.cfg, with the exact folder name. For a split pack, one line per part, in the order the README gives. - Restart the server, then fully close and reopen FiveM before you join.
- Open your clothing menu on a freemode ped. If your menu has its own list of clothing, it may need the new collection added to it.
- Wear every piece on both genders and check the undershirt, the sleeves and every colour.
Run a test server first. Only use clothes you made or have permission to use.
Questions about FiveM add-on clothing
What files does FiveM add-on clothing need?
Per piece, a .ydd model and a .ytd texture file, in a stream folder named after the ped and the collection. Per pack, a .ymt that describes the pieces, a shop metadata file that registers the collection, and an fxmanifest.lua at the top of the resource. Props such as hats use a .ydr model instead of a .ydd.
Do I need a subscription or special tools to stream add-on clothes?
You need the files and a correctly written resource, not a special tool. By hand that means a way to build the YMT and the shop metadata. The FiveMRides Clothing Studio (BETA) writes the YMT, the metadata and the manifest for you and verifies the ZIP before download.
What is the limit for add-on clothing in one resource?
255 drawables per clothing type, per gender, per collection, and 26 colour variations (a to z) per drawable. Above that, split the pack into several resources. The Clothing Studio does the split for you and lists the ensure order.
Can add-on clothes be used on any ped?
Add-on clothes are made for the two multiplayer freemode peds, mp_m_freemode_01 for male and mp_f_freemode_01 for female. Other peds do not use this clothing system.
Can I turn a replace pack into add-on clothes?
Yes. The files are renumbered into a new collection and the YMT and shop data are written for it, so nothing in GTA is replaced. By hand this is the step where most mistakes happen. The Clothing Studio offers it as Add as new clothes.